When I stand before God at the end of my life, I would hope that I would not have a single bit of talent left and could say, "I used everything you gave me, Lord." I am a believer that God created each one of us with a unique talent, therefore, use it well to serve Him.
Showing posts with label Cricut Projects. Show all posts

Thursday, August 18, 2011

Luau/Hello Kitty Birthday Invites

I started working on this project since June but I stopped in the middle of it.  I honestly thought that the birthday party will not push through anymore.  But then things changed and I decided to finish up the invites couple nights ago and it took me 4 nights of no sleep.  Seeing the result though made me really happy.

I'm also trying to save money on the projects since I'm the one who is paying for it.  I used Colorbok cardstock stack that you can get from Walmart for $4.  It maybe cheap but the colors are so vibrant and for me it is one of the best cardstock for cutting using Cricut machine.  I made a total of 50 well detailed Hello Kitty/Luau birthday invites. 

Here, I'm so proud to share it them with you...
50 sets of invites and envies.  What you see in the picture was just half of the total production.
I used 7 different colors for envies.  The colors are just so vibrant!
Also made 7 different colors for invites.
A closer look on the actual invites...
A simple printed insert.  I used MA Sexy and 1942 report fonts.
I used the CTMH Cricut Cartridge Art Philosophy bundle for the labels and CTMH stamps for the sentiment.  I so love the CTMH cartridge. It eliminates the need for you to buy those dies and punches that matches your stamps.  If I were you, I would get hold of one...

That's it for today.  These were all my projects that I haven't posted and/or accomplished the last couple months.  I know I've been MIA for quite awhile but hopefully I'll get back to doing at least one crafting project a week.  

Thank you for stopping by.  Take care.  Until next blog... Have a happy weekend peeps!

Wednesday, August 17, 2011

Cricut Cartridge: Floral Embellished

Here are another bunch of cards I made using Cricut cartridge: Floral Emebellished.  And like the other times, I tried to get by with what I have in the other house.  Hope you like them!


Aren't those flowers gorgeous!?

Another Damask Decor cards

Here are 2 cards I made using Cricut Cartridge Damask Decor.  It's quick, easy and I like it!


Cricut Cartridge: Damask Decor

Here is  a set of Thank You cards I made using Cricut cartridge: Damask Decor.  Honestly, it came out as a set of thank you card because I do not have any kind of sentiment stamp while doing this project in the other house.  Well, that's a set back for having two houses but very slowly I'm dividing my stuff into two so I can do crafting on both houses.

 
Until next time...

Saturday, March 19, 2011

NCM Project #12 - Wedding Guestsbook

A neighbor who is now a dear, dear friend, and I are becoming really close and spending alot of time talking, going out and doing things together. Like I mentioned several times in my blog, she's very kind to us, driving us where we need to go and even grabbing grocery stocks for us.  In return,  I love making her something that I made and most of the time its either food or crafting projects.  Couple weeks ago, she asked me if I would be willing to make her a wedding guestbook and scrapbook for her friends who are getting married in April.

Color motif are turquoise and ivory.  Again, I used a thick plastic sheet I got from Grafix Arts as a cover. 
 I framed the couples picture that I took from the wedding invitation.  Added Prima flowers, letter charms, sticker sentiments (from Philippines), diecut flowers and acrylic frame.  If you noticed the acrylic frame matches the card.  To be able to come up with the same color as the paper, I wet a cotton ball with rubbing alcohol and put a drop of SU reinker.
 I used April Shower cartridge for the panel sheets.  I used chipboard sheets then sandwiched it with CS.  I did it that way to make sure each panel will not get wrinkle by people who are signing it.  I added diecuts and tiny flatback pearls as a embellish on each pages.
 I asked Lia whether she prefers a guestbook that has lines on it.  I suggested to go with guestbook/wishbook, so guests can leave comments, advices or just plain well wishes to the couple and she took my advice for it.  That should explain why its plain inside.
 I used Stampin Up! CS for the color turquoise and I used Gina K luxury paper for color ivory.  Then I used Wassau for the metallic gold for diecut images.  I used the cartridge Botanical for the diecut.
 I'm not sure if you can see in this picture the plastic sheet cover I used.  I dressed it up with ivory colored tulle that has glitters, satin ribbon, pearl string/garland and a pair of wedding bands.
I made a total 15 (30 pages back to back) panels for the guestbook and hopefully that will be enough for the couple's guests to write on.
 I cut all the panels using Cricut machine but what I don't understand was the CS was cut differently from chipboard.  Trimming each pages and sanding them afterward was extra work that I didn't expect.  What's bad was I had to sufferer for days for sinusitis headache because of the dust I got from the papers while sanding it.  Also, I used my Xyron big sticker machine for each flower diecuts and it suppose to make thing easy, instead I ended up erasing extra adhesive, which was a tedious job.  I hate seeing adhesives on any projects.

At the end, I was pleased with this project even if it took so long to finish it.  Someone was so happy too with it and cant stop from saying WOW.  Hopefully her friend would like it and so do you!

Thanks for looking and for keep on posting your projects at our NCM challenge.

NCM Project # 11 - A Scrapbook Wallclock

Finally, at 230 AM I got done with my project I was working on for more than a week now.  Since I was still all worked-up from doing it, I started another project.  Couple years ago I've seen a handmade wallclock and thought that it was an interesting project.  Way back then, I bought a square and a circle wallclocks from Oriental Trading but sadly I didn't get all the parts that supposed to go with it.  Luckily I grabbed a bunch of wallclock parts at Hobby Lobby the last time we were there. 

So without further ado, here's my very own version of wallclock project...

RECIPE:
PAPER: Bo Bunny and Bazzill Basic Paper
TOOLS: Cricut Expression, Gypsy, PC paper trimmer, ATG, Zig 2-way glue pen, Modge Podge and Xyron sticker maker
CARTRIDGE: Songbird (font)
EMBELLISH: K & Company Vellum Quotes Titles "Families are Forever" and rub-ons from Art Arehouse
OTHERS: wallclock from Oriental Trading and clock from Hobby Lobby and wrench

Hope you like this project and would be willing to try it too...

Thursday, March 10, 2011

NCM Project #6 / Cricut Circle Magazine Challenge - Cricut Everyday

Here is my take for Cricut Circle Magazine Challenge - Everyday Cricut.  The challenge is to make a project using the Everyday Cricut cartridge that would define yourself at meet-ups, Crops, the Stampede, and any other circle events.  Projects varies from business cards, tags, table decor or something to swap.

I made this banner using a 5X5 scrap chipboard sheets (leftover from the Dinosaur book).  Covered the chipboards with Cricut color motif.  Then I highlighted each banner with the Cricut machine that I owned.  I matted the image using a die-cut doily from Everyday Cricut cart too, punched a hole and added some silver flower brads.  I used about an inch binder rings to hold each piece of banner.  The phrases included was computer generated since that part of the cartridge still needed to get fixed.  "I caught the bug!" was my theme.  It defines me as a Cricut hoader LOLz...

Here you go!

RECIPE:
PAPER: CTMH, KMA and Martha Stewart
TOOLS: Cricut Expression, Gypsy, Crop-A-Dile 2, PC paper trimmer, ATG, Zip Dry, Plaid pop dots and Zig 2-way glue pen
CARTRIDGE:  Cricut Everyday
EMBELLISHMENT: flat-back pearls and silver flower brads
OTHERS: scrap bare chipboard sheets and binder rings

Haven't heard of my yummy blog candies?  Go to THIS and THIS!

Saturday, March 5, 2011

NCM #5 Project/ Cricut Circle Monthly Challenge - Children at Play

I've been really quiet the last couple days because I was really busy working on this big project. Cricut Circle Monthly challenge is up again and this time the challenge is Children at Play. The rule for this particular challenge is to create any project (except card and LO) in honor of our lovable children. The good thing about this is, you will be playing to win a Litely-Loved Cricut Expression with 4 cartridges, for your local school. Great cause, right!? Project ideas include but not limited to gift items, toys, organizing solutions, items for school and stationary set. Entries must include 2 different Cricut Image cuts.

As soon as I read the rules, I know exactly what project should I make.  Boy, it took me almost 3 days doing this but all the hard work paid off when I gave it to my son, Jackie.

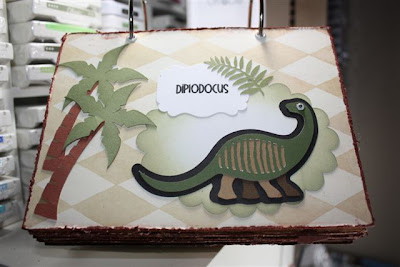
Let's cut the blah, blah and let me show you what I made. So are your son as crazy as mine about Dino Dan?  Well, Dino Dan was my inspiration for this project.  Since my 4 yr old little boy loves to show off to other people that he knows Dinosaurs and know how describe each of them. So I thought why not make him his very own Dinosaur Book.  I know that it was crazy because it required so much time and lot of hard work but I just have to do it.  Anyways, I bought Dinosaur Track cartridge because of him...

 Here's the front of the book.  I used Nate's ABC cartridge for the image and fonts.
 T-Rex
 Raptor
 Baryonyx
 Spinosaurus
 Trachodon
 Dilophosaurus
 Pachycephalosaurus
 Coerulus
 Hadrosaurus
 Parasaurolophus
 Dimetrodon
 Leptoceratops
 Torosaurus
 Triceratops
 Protoceratops
 Stegosaurus
 Ankylosaurus
 Tarchia
 Amargasaurus
 Supersaurus
 Brachiosaurus
 Diplodocus
 Pteranodons
 Pterospondylus
 Plesiosaurus
  Placochelys
 Glyptodontopelta
 At the back of each Dinosaur page, I used a page protector to insert information.
 This is how the back looks like.
 Thanks to Wikipedia for all the informative facts.  I wish I had more time to incorporate information from other sources.
 With this project I get to use my newly bought Distressed-It-All and my Jurassic patterned paper LOLz... Glad it finally serves its purpose and not collecting dust anymore. 
 My Jurassic era patterned paper really matched this vintage distressed look Dinosaur book. 
 Added couple beads into the binder rings as added touch.  I used eyelets too on the punch holes to make sure the book will last.
 
Took me almost three days to get this done.  With the cutting, assembly and research, I was totally exhausted when I go to bed yet eager to wake up and start working again the next day.    These are the things that we do for our children.  And despite how hard it was, it's all worth it.  I hope he'll take care of this book and will have many use for him.  When I got done with this, my daughter told me that now I have to make her a fairytale book since I have most of the Disney carts.  Now, that will be a torture! LOLz...

RECIPE:
PAPER: CTMH, Bazzill and GP white (CS), unbranded patterned paper
TOOLS: Cricut Expression, Gypsy, Distressed-It-All machine, EK Success papershaper, PC paper trimmer, ATG, Zip Dry, Plaid pop dots and Zig 2-way glue pen
CARTRIDGE:  Dinosaur Tracks (dinasaurs, ferns, palm trees, tag, pick, brush and leaves) Storybook (scalloped oval), Nate's ABC's (boy reading a book and  font)
EMBELLISHMENT: wooden beads, eyelets
OTHERS: bare chipboard sheets, binder rings, protector sheets, chalk

I'm taking this opportunity too to please join us for some giveaways.  Click HERE, HERE and HERE to more info.

Until next project!